
Workflow · Listing and closing workflows
How to build a listing launch workflow
Fix the go-live date with the seller, then run paperwork, media, property access and MLS entry as four chains counted back from it, each step with one owner and one piece of evidence. The timeline, the ten steps, and how to hold the sequence as a template in dotloop, SkySlope, Open To Close, ListedKit and DeedSpring.
When does the launch start, and when is it done?
It starts when the listing agreement is signed. Agents on r/realtors are blunt about it: no paperwork, no listing, and nothing gets booked until the contract is in. The second prerequisite is a date. Agree the go-live day with the seller at signing and write it down, because every other date in the workflow is counted back from it.
It is done when four things are true at once. The listing is active on the MLS and you have read the published entry back against what you typed. The sign and lockbox are on the property and the showing service takes bookings. Every disclosure the brokerage requires before publication is signed and filed. And the seller has the link. When an offer is accepted the launch file becomes the under-contract file, and SkySlope gates that handoff: the button to convert the listing stays greyed out while Required checklist documents are unsubmitted, unless an Admin or Broker marks them Not Required.
Who does what?
The agent owns the seller and every judgment call: price, the go-live date, the approval of photos and copy, and any disclosure question only the seller or a broker can answer. The coordinator owns the chains: the disclosure packet out and back, the photographer booked and chased, the property facts gathered, the MLS draft built, the compliance file submitted, the live listing checked. The seller owns disclosures, prep and access, and needs the date for each in writing. The photographer owns delivery by a date. The broker owns the compliance review, and the brokerage decides what must be in the file before publication.
The slowest party sets the pace. One agent on the same thread, in a market where more than half the active listings are condos or townhouses, says the association paperwork is the long pole: start chasing it the day the agreement is signed and fit the photos and the go-live date around the management company's answer. Find your long pole on day one and give it an owner.
For Florida condos, our Miami page covers the association package and the building reports a resale carries.
Why work backward from the launch date?
Because the launch date is the only date the seller cares about and the only one everyone has agreed to. Count forward from signing and the date drifts with every late reply. Count backward and a late reply shows up as a specific step at risk, with a name on it. One agent needs four or five days' notice to schedule photography, get edited photos back and prepare the marketing, and wants every disclosure complete before go-live. In another market a new staging and photo date can be two weeks out. Put your own numbers in, in working days, and hand the seller the one-page timeline at signing.
“The useful part is agreeing on dependencies upfront, so if photos or paperwork slip, everyone understands what moves with it.”
Our Austin page covers one more dependency for sellers there, the city energy audit that is best ordered when the home is listed.
One rule pins the back end of the plan. NAR's Clear Cooperation model rule says that within one business day of marketing a property to the public, the listing broker must submit the listing to the MLS, and it counts yard signs, flyers in windows, public-facing websites, email blasts and public apps as public marketing. So the yard sign and the email blast to your database are public marketing, and the simplest plan puts both out on launch day, after the entry. Since 2025 a seller can instead choose a delayed marketing exempt listing under NAR's Multiple Listing Options for Sellers policy: the listing is filed with the MLS, public marketing through IDX and syndication is delayed for a period each MLS sets, and the seller signs a disclosure consenting to it. The policy took effect March 25, 2025, MLSs had until September 30, 2025 to implement it, and it leaves the one-business-day filing rule in place. How long that period lasts is your MLS's decision, so settle it with the agent before you set the date.
The launch timeline
Four chains that meet on launch day, in working days counted back from go-live
| When | Paperwork | Media and copy | Property and access | MLS and systems |
|---|---|---|---|---|
| Day 0: agreement signed | Agreement signed. Disclosure, agency and lead-paint forms sent. HOA documents requested. | Photographer booked for launch minus four at the latest. | Seller gets the prep list and photo date. Sign and lockbox ordered. | Launch date and MLS status agreed in writing. |
| Launch minus 5 | Disclosures chased. Anything unsigned is named to the agent. | Public remarks drafted. | Property facts collected: tax record, measurements, utilities, HOA fees. | MLS draft built from the fact sheet, saved incomplete. |
| Launch minus 4 to 3 | Every disclosure signed and filed. A late one moves the date. | The shoot happens. Files due within 48 hours. | Lockbox and sign delivered, not installed. | Showing service configured, not yet open. |
| Launch minus 2 | Compliance file submitted to the broker. | Agent approves the photo set and the copy in one reply. | Seller confirms the home is show-ready. | Photos and remarks loaded on the draft. Agent reviews the entry. |
| Launch minus 1 | Broker review cleared, or the launch moves. | Launch kit built: database email, first post, flyer. | Lockbox installed. Showing instructions written. | Entry complete. Coming-soon status set if used. |
| Launch day | Entry printout filed against the fact sheet. | Database email and first post go out. | Sign installed. Showings open. | Listing activated. MLS number recorded. |
| Launch plus 1 | Seller sent the live link and the first-week note. | Scheduled posts continue. | Feedback requested after the first showing. | Published listing read back field by field. Syndication checked. |
Down a column is one person's week. Across a row is what must be true that day for the launch to hold: no MLS entry without the facts, no photo approval without the files, no sign without the entry.
How do you run the launch, step by step?
Step 1: Fix the date and hand over the timeline
At signing, agree the go-live day and the MLS status with the seller and give them the one-page timeline: photo date, disclosures due, launch date, first week.
- Owner
- Agent
- If it fails
If the seller wants a date the photographer cannot make, move the date. The order never moves.
Step 2: Open the file and send every form the same day
Disclosure packet, agency form, the lead-paint disclosure where it applies and the HOA request go out together, each with a due date. The signed copies on the checklist are the evidence.
- Owner
- Coordinator
- If it fails
A disclosure still unsigned four working days out goes to the agent that day.
Step 3: Book the photographer before anything else
Book for four working days before launch at the latest, and send the seller the prep list and the date in the same message. If the photographer slips, move the launch date the same day.
Step 4: Collect the property facts and build the MLS draft
Tax record, measurements, year built, utilities, HOA name and fees, schools, and the seller's answers to the rest, on one sheet you will check the published listing against.
Step 5: Order the sign and lockbox, and set up showings
Order both on day one, install the lockbox the day before launch, and keep the sign off the lawn until the listing is in the MLS. A yard sign is public marketing under the one-business-day rule.
Step 6: Approve the media and the copy in one sitting
The agent approves the photo set, the order of the first six, the public remarks and the showing remarks in one written reply.
- Owner
- Agent
- If it fails
A reshoot restarts the media chain and moves the launch date.
Step 7: Submit the compliance file
Two working days out, the broker gets everything the brokerage requires before publication. What may follow publication is the brokerage's rule, so ask once and write it into the template.
- Owner
- Coordinator
- If it fails
A rejected item goes back to its owner within the hour, with the launch date in the message.
Step 8: Complete the entry and set the status
The day before launch the entry is complete, photos in the approved order, remarks pasted from the approved copy, and the status is the one you agreed: active tomorrow, coming soon, or a delayed marketing exempt listing with the seller's signed disclosure on file.
Step 9: Launch
Activate the listing, record the MLS number, install the sign, open showings, and send the database email and the seller's link the same morning.
Step 10: Read it back and start the first-week loop
The next day, check the published listing field by field against your fact sheet, confirm it syndicated, request feedback after the first showing, and send the seller the first-week note.
- If it fails
A mismatch is corrected in the MLS first and in your file second, and logged with the date.
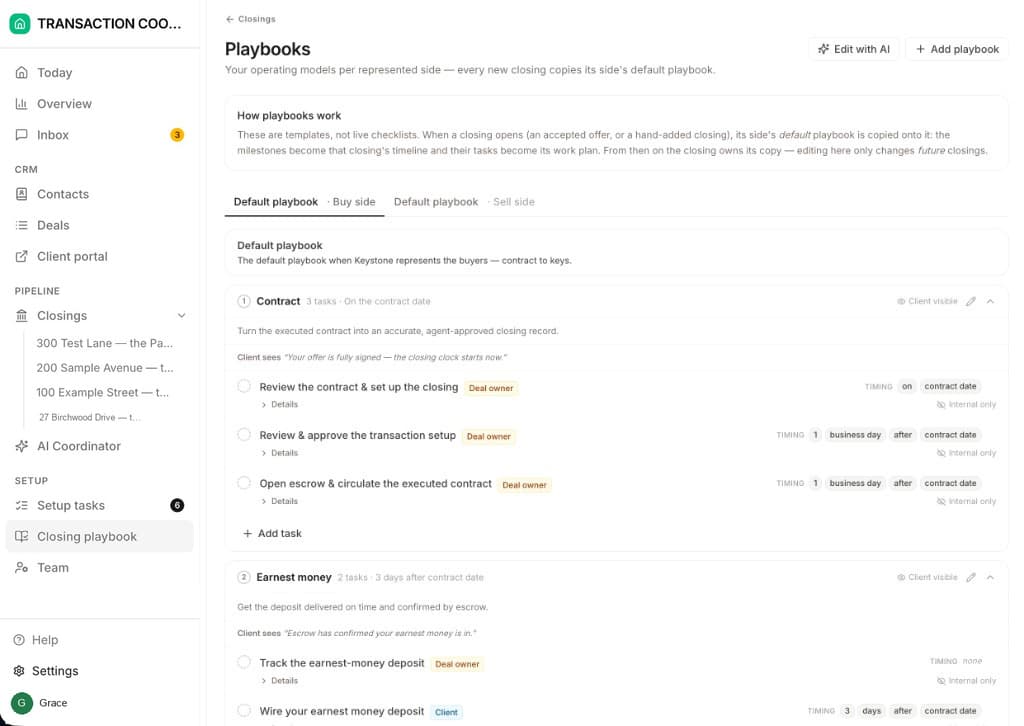
Written down this way, the launch is a playbook: milestones in order, a task under each with an owner and a date, and a line that says what the seller sees. That is the shape of a DeedSpring playbook. Each task names who does it, Deal owner, Client, External party or AI, and whether it is Internal only or Client visible, and the steps the seller can see carry plain-English wording. Every workspace also arrives with an automation that activates the next milestone when one completes, and a showing-feedback chase for the first-week loop.
How do you build it in your software?
Each tool holds the sequence as a template. What matters is whether a step can depend on another step or on the launch date, because that is what turns a list into a plan. In dotloop the container is a loop template, a Business+ feature that controls the people, documents and task lists auto-added when a loop is created, usually one per transaction type, and an admin can require every loop to use one. Build the launch as a task list and load it into the listing template. Each task takes a default assignee, who is added to the loop and notified, and a due date that is either a time frame or after another task on the list has been completed, which is how photo approval waits for photo delivery. Documents can be marked Require to Submit, so the disclosures gate the review.
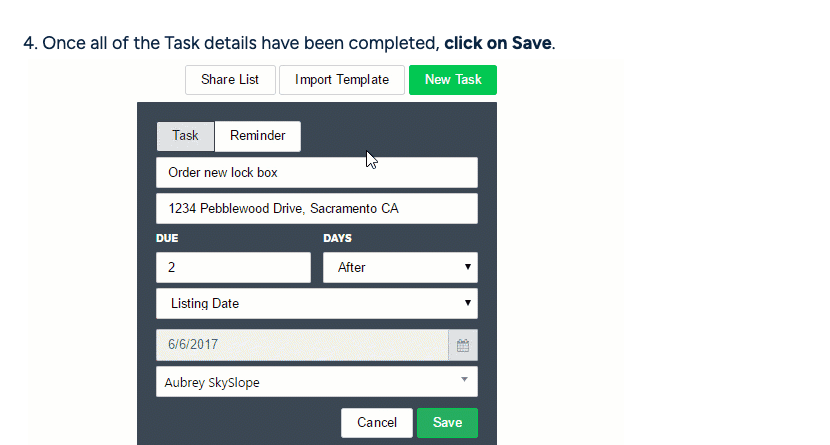
SkySlope keeps paperwork and tasks apart. Create a Listing opens the file with a Checklist Type that generates the Required Documents list, the listing and expiration dates and the seller contacts. The sequence lives on the Tasks tab, where each task has a title, an assignee, and a due date or a dependent due date, and the help page's own example is a lockbox order due two days after the Listing Date. Build the list once as a Task Template in the Task Hub, import it into each listing file, and switch on the daily email of tasks due.
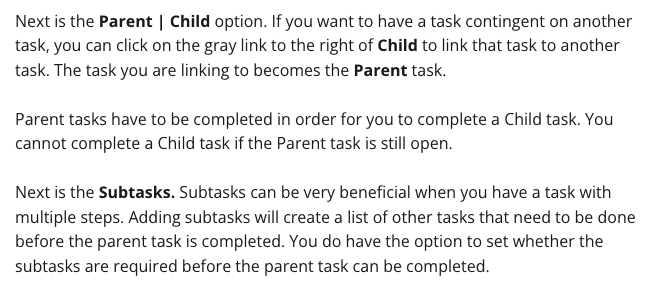
Open To Close makes the dependencies explicit. A new property can be a listing or a pre-listing file, and a property template stacks task, date, field, document and trigger templates onto it in one step. In a task template any task can be linked as Parent and Child, and the Parent has to be completed before the Child can be. A date template counts business or calendar days before or after a reference date, with weekend and holiday roll, so launch minus four is a computed date. A trigger on a task sends an email or a text when it completes, or when it has not been completed.
ListedKit starts from the paperwork. Upload the listing agreement and it opens the file. Your launch checklist goes in as a CSV, a screenshot or a pasted list, its help page says, and any task tagged Email Task is drafted for you on its due date. A listing setup is one credit and going under contract is another, at $14.99 a credit.
What does DeedSpring do once the listing is live?
When the offer is accepted, open the closing from the executed contract and DeedSpring's sell-side playbook arrives with disclosures and payoff already on the chain. Add playbook keeps a second process beside the default for a pattern you run often, and an edit made on a live closing changes that transaction only, so the template stays clean. Your seller keeps one login: the portal shows them My listing, Activity, Showings & Offers and Closing, filtered to their own file.
Starter is $15 a month for one closing a month. Standard is $25 a closing, less at volume, with unlimited agents and teammates and unused closings rolling over. Both are month to month, on the pricing page.